Maybe some of you already make your own chicken stock or maybe you have been afraid to try. Well, I am here to tell you that it is very simple and extremely cost effective! There are versions of making your own stock that do require a few more time intensive steps, but I tend to go the easy route - otherwise I won't do it. And the end result is always delicious! By the way, your kitchen/house will smell amazing while you are making this.
You will need:
freezable canning jars or storage containers
whole chicken (preferably organic/natural)
veggie scraps
water
vinegar or lemon
sea salt

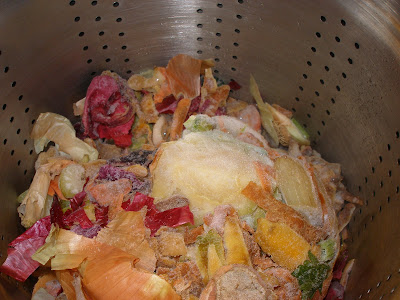
Step one requires a bit of forethought, but once you start making this a habit it will soon become a natural part of your life. Start collecting vegetable peels/scraps, throw into a storage container or gallon bag and keep in the freezer. Since I buy the dirty dozen and root vegetables organic (as well as the various CSA veggies we get) I save the tops/bottoms of onions along with the peels, carrot peels, potato peels, celery ends, zucchini ends, garlic remains (what is left after pressing through my garlic press) and peels, left-over parsley and other herbs...you get the idea. However, I don't recommend using cruciferous veggies like cabbage and broccoli. Once you have collected a good amount of vegetable scraps you are ready for stock making. You can also use a whole onion (along with peel), a carrot, celery stalk, etc. for flavoring your stock if you don't have a collection of scraps and don't want to wait that long.

Step Two: Place vegetable scraps, chicken and parts (if you have misc. parts from other chickens - save those in the freezer for stock making too) and water in a large stock pot - preferably one with a lift out strainer, it just makes things easier. Or you can use cheese cloth for the chicken (wrap it up and tie it off for easy removal). You can also do this in a crock pot, but I prefer to make a larger batch than what fits in my slow cooker.

Step Three: Bring water to a boil, add a splash (about a Tablespoon) of vinegar or lemon juice, and simmer until fragrant (this is when you can sit and relax for a few hours, enjoying the incredible aroma coming from your kitchen) when the chicken falls apart as you lift it out of the pot/water - you know your stock is done. The vinegar/lemon juice sucks the good stuff (and bad) from the bones and adds it to your stock - don't worry, you won't even taste it. This is why I recommend an organic or natural chicken - if you happen to have a sick or pesticide laden chicken that nasty stuff will end up in your stock too. ***UPDATE: I recommend cider vinegar, red/white wine vinegar or rice vinegar rather than plain white vinegar. Also, you will get the most nutrients into your stock and out of the bones of your chicken if you let it cook for 24+ hours - I typically use my crockpot now and do several batches. I do, however, remove the meat from the bones when the chicken starts to fall apart, then I throw the bones back in the pot.***

Step Four: Remove chicken to plate or bowl (I use a tongs and sometimes have a few parts to deal with if the legs or wings fall off). Allow the chicken to cool and strain the veggie scraps from the liquid. This is now when you add salt if you want to. Sometimes I add salt, but most of the time I just wait until I use it in a recipe.

Step Five: Ladel or pour chicken stock into freezable canning jars (wide mouth is preferable) or storage containers. Remember to leave some headspace for the stock to expand when frozen. Label and place the jars/containers in the freezer. If you use plastic storage containers I would recommend letting it thaw in the fridge overnight due to the chemicals in plastic leaching into your food during reheating. As long as you remove the metal rings on the canning jars before thawing, it is fine to put the glass jars in the microwave. Or you can always thaw in the sink in cold water.

Step Six: Remove skin and bones from cooled chicken and discard. Save the chicken and use for a variety of meals: quesadillas, potpie, enchiladas, tacos, soups, an appetizer dip, a pasta dish, etc. Just remember that you have taken most of the flavor out of your chicken and placed it into your stock. So use your cooked chicken in dishes that can be made quite flavorful from other ingredients!
***UPDATE: Once you remove your first batch of stock, add more water to the mix and a bit more vinegar and cook for another 24+ hours. You will continue to get nutritious bone broth which will likely have less flavor than your first (and potentially second) batch(es) of stock. I like to use this bone broth for soaked oatmeal, noodles, rice, beans, pretty much anything that calls for water - that way the added nutrients from the bone broth get into our food (without my family realizing it).***
No comments:
Post a Comment