Showing posts with label whole grain. Show all posts

Wednesday, May 9, 2012

Homemade Raisin Bran


I was probably one of those odd kids whose favorite cereals were Raisin Bran and Cracklin' Oat Bran growing up. But since I have given up boxed cereal I have been craving something other than granola as a quick, easy and portable breakfast. Then I thought about it one day - why not make my own bran flakes and add raisins to it. I had thought about trying completely from scratch on my own, but did a recipe search online first and found that there were in fact many recipes out there. I tried one from Mr. Breakfast, that I adapted slightly the first time. It was okay, but it needed some tweaking. My second batch was much better, which was good news since I doubled the recipe. So, here is what I came up with.


Oh and the soaking part of this is not necessary, but will provide you with more nutrients than you would get without soaking. Also, if you don't have a dehydrator, you can bake it in the oven - I'd say at the lowest temperature, but I've read that anything over 170 degrees is killing some of the nutrients anyway - so no need for soaking if you are going to cook away all those additional nutrients.

This post is part of Real Food Wednesday; Whole Foods Wednesday; Simple Lives Thursday and Creative Juice.


Homemade Raisin Bran

Ingredients

  • 1/2 cup Bran
  • 1/2 cup Oats, processed until fine
  • 1/3 cup Almonds, finely ground
  • 3 Tablespoons Honey
  • 1 Tablespoon Molasses
  • 1/3 cup Milk
  • 1/4 cup Water
  • 1/4 teaspoon Baking Powder
  • 1/4 teaspoon Salt
  • 1 Raisins to taste

Directions

  1. Combine bran through water and mix thoroughly. Soak overnight in a glass bowl covered with a towel or plastic wrap.
  2. In the morning sprinkle with salt and baking powder and mix to combine thoroughly.
  3. Using parchment paper or a Silpat underneath and a piece of plastic wrap on top, roll out the batter as thin as possible to create one large flake.
  4. Place in dehydrator (anything under 150 would be best) or in oven (300 degrees) until crisp. In the oven you may need to flip the large flake over to get both sides sufficiently crisp; check on it frequently.
  5. Break into small pieces and add raisins (and milk) to taste.
Prep Time: 9 h Cook Time: 5 h Ready in: 14 h
Click to add this recipe to your Recipe Book
Homemade Raisin Bran courtesy of Jamie Del Balso.

Wednesday, April 4, 2012

Left-over Rice - For Breakfast


Lately I have found myself throwing away left-over rice that has sat in the refrigerator for far too long. :( Once we are finished eating the left-over food that went with the rice I never know what to do with it. Then, it came to me the other day - BREAKFAST. I was cooking eggs for a typical fried eggs and toast meal, but I wasn't really in the mood for toast. Suddenly I had an urge to have my yolk a little runny (which is not normal for me at all - I like my fried eggs over HARD). Thinking of the left-over rice in the fridge, and an article that I had read about breakfast in other cultures not being so "set" as our American breakfast, but usually more like last night's dinner re-heated; I decided to try a scaled down version of Bibimbap for breakfast. Basically seasoned rice (soy sauce and hot sauce) with a runny egg over the top - and I LOVED IT!

I enjoyed my runny egg over rice breakfast so much, I decided to do it again, but this time I added sauteed carrots and spinach to it. Even better! Really this could be a meal for any time of day - Breakfast, Lunch or Dinner. Now I am looking forward to having left-over rice in my fridge and using it to add variety to my breakfast repertoire. In the recipe below I added some veggie ideas for the Breakfast Bibimbap, but I say whatever you have on hand would go great with your runny egg and seasoned rice. Oh and measurements for seasonings below are approximate, I didn't really measure, I drizzled the Tamari and Toasted Sesame Oil over the rice. Be Creative!


This post is part of Real Food Wednesday, Simple Lives Thursday, It's a Keeper Thursday, These Chicks Cooked, Creative Juice, and Gluten-Free Wednesday.

Breakfast Bibimbap

Ingredients

  • 1 cup Left-over Rice
  • 1 teaspoon Tamari (Soy Sauce or Shoyu)
  • 1 teaspoon Toasted Sesame Oil
  • Hot Sauce to taste
  • 2 Tablespoons Butter
  • 1/2 Carrot, sliced in rectangles
  • 1 Handful of Spinach
  • 1 Handful of Mushrooms, sliced or chopped
  • 1 Handful of Bean Sprouts
  • 1 - 2 Eggs
  • Salt and Pepper to taste

Directions

  1. Re-heat left-over rice and add Tamari/Soy Sauce, Toasted Sesame Oil and Hot Sauce.
  2. Melt 1 Tablespoon of butter in a pan over medium heat, add sliced carrots, mushrooms and bean sprouts (or veggies of choice). Season with salt and pepper.
  3. Pour boiling water over spinach until wilted, and press out excess water.
  4. Place cooked/wilted veggies over seasoned rice.
  5. Add remaining Tablespoon of butter in hot pan and add egg(s), salt and pepper as desired. Cook egg sunny side up or over easy, so that yolk is still "runny" - which adds great flavor to this dish. Place egg on top of veggies and rice.
  6. Dig in!
Prep Time: 5 min Cook Time: 10 min Ready in: 15 min
Click to add this recipe to your Recipe Book
Breakfast Bibimbap courtesy of Jamie Del Balso.

Wednesday, January 18, 2012

The Best Cookies I've Made


My husband LOVES chocolate chip cookies.  They are one of the few cookies we do make.  Once my husband thought I had perfected the traditional chocolate cookie recipe I started experimenting with whole grains.  My skillet cookie recipe is good, but this is even better (for cookies that is).  And my husband would likely agree that these are even better than my non-whole grain version. In fact, he usually prefers frozen dough to baked cookies, but he said the baked version actually rivals the dough - that means they are darn good!  Okay, okay enough about how good they are.  I promised a recipe using coconut oil today and this does.  My plan, however, had been to share my soaked granola recipe, but since this was only the second time I've made it and I did not write down what I did the first time, I still need to tweak it a bit to get the same results as the first batch.

Even though we LOVE these cookies and sweets in general, we try to keep our sweet intake to about once a week.  Unfortunately the month of December often messes with this plan and lingers through January.  At the moment our goal is Sweet Treats only on Sundays, not after every dinner (or meal if the kids had their way).  Once sugar enters our lives it is so hard to get it out again.

This recipe was somewhat of a fluke.  We didn't have any oat flour on hand and I know the key to good chocolate chip cookies is the sweetness of the oat flour.  I did, however, have oats and decided to throw them in my food processor until fine.  The result, a deliciously oaty crisp cookie that was not quite what I expected.  Normally we prefer somewhat chewy, but I was shocked to discover that they were even better the next day than they were hot out of the oven.

Best Whole Grain Chocolate Chip Cookies

Ingredients

  • 1 1/2 cup Rolled Oats, chopped until fine in food processor/blender
  • 1 cup Spelt Flour
  • 1/4 cup All-purpose Flour (could probably use spelt or other wheat flour)
  • 1/2 Rolled Oats not processed
  • 1 teaspoon baking soda
  • 1/2 teaspoon salt
  • 1 cup Turbinado/Demerra Sugar
  • 1 Tablespoon Molasses
  • 1/2 cup (1 stick) butter, softened
  • 1/4 cup coconut oil
  • 1/4 cup palm shortening
  • 1 egg
  • 1 egg yolk (save white for another purpose)
  • 1 + teaspoon vanilla
  • 1 cup chocolate chips (Callebaut are my favorite)
  • 1 cup chopped nuts (optional)

Directions

  1. Preheat oven to 375 degrees.
  2. Combine dry ingredients in small bowl and set aside.
  3. Place Turbinado and Molasses in bowl of standing mixer and mix until fully combined.
  4. Add butter, coconut oil and palm shortening, mix until creamed.
  5. Add egg, yolk, and vanilla mixing after each addition.
  6. Add dry ingredients and mix until fully combined.
  7. Stir in chocolate chips and nuts (if using).
  8. Line baking sheets with a silpat or parchment paper for easy clean up. Use a cookie scoop or a spoon to place small balls on cookie sheets. Provide space for cookies to spread. Should make about 3 dozen cookies or more, depending on how much of the dough you eat.
  9. Bake for 8 minutes, rotating from top to bottom and front to back halfway through. Allow cookies to cool on cookie sheet for a few minutes before transferring to cooling rack. These cookies actually taste best when fully cooled and allowed to crisp up a bit. Pour a glass of milk and enjoy!
Prep Time: 30 min Cook Time: 30 min Ready in: 1 h
Click to add this recipe to your Recipe Book
Best Whole Grain Chocolate Chip Cookies courtesy of Jamie Del Balso.

Tuesday, May 10, 2011

Potluck Quinoa


A couple of weeks ago we were invited to a potluck at a neighbor's house, but there were a few dietary restrictions.  Our host told us not to worry about it, but if we brought something which contained an item from their dietary restrictions and they did not eat it, that would be why.  I had some left-over veggies with spinach dip and watermelon from my son's birthday party, but decided I should bring something else too.  The night before the potluck, I threw some black beans in my crockpot to soak and as an inspiration for a dish to bring.  So, let's see, something that is gluten free, dairy free, meat free and does not contain any sugar...  I didn't have a lot of time to look up recipes, but I glanced through a vegetarian cookbook to see what kind of quinoa recipes it had.  Hmm, not many.  I decided to create a Mexican Quinoa dish and it turned out pretty good.  Another neighbor commented that he liked it and then told me that he normally does not like quinoa.  So, if you ever need to go to a potluck and bring a meat free, dairy free, gluten free, and sugar free dish - try this one out.  Or, make it as a side dish to any mexican meal you have or it could even be a main dish with a side salad.

I'm hoping that most of you reading this have already heard of Quinoa, as it seems to be gaining popularity these days.  But in case you have not, I'll tell you a little bit more about it and why I love it so much!  Quinoa is a truly versatile grain that can easily turn something into a main dish.  It has 14g of protein per 3.5 oz serving (uncooked) and 7g of fiber and is nearly a complete protein in and of itself.  Knowing this little grain was so good for me I tried several times to make dishes with it and did not care for it.  Then, I finally discovered the secret - broth, cook the grain in BROTH!  It has much more flavor this way and then add whatever you want to it or serve another dish over it.  Recently I made a pilaf out of it by adding a cinnamon stick to the broth while the quinoa was cooking and then some nuts and dried fruit when it was finished.  If you have never made quinoa before, it should open up a bit and look kind of like a curlicue and should have a touch of crunch to it, as if it were bursting in your mouth.

Mexican Quinoa

Ingredients:
3/4 cup Quinoa
1 1/2 cup chicken or vegetable stock
1/2 cup frozen corn
1/2 cup dry black beans (soaked overnight and cooked)
1/4 cup canned diced tomatoes in sauce (or fresh)
1/2 tsp cumin
1 clove garlic, crushed
handful of chopped cilantro
sea salt to taste
drizzle of olive oil
splash of red wine vinegar

Preparation:
Bring stock to a boil and add quinoa, cook for 12 - 15 minutes until tender, but retains a bit of crunch.  Stir in frozen corn during the last few minutes of cooking then add remaining ingredients cooked black beans, diced tomatoes, cumin, garlic and cilantro.  Salt the quinoa to taste, add a splash of red wine vinegar then drizzle with olive oil.  Serve warm or cold.

For a printable version of the recipe above, click on the title of the recipe.

Have you used quinoa?  What is your favorite way to prepare it?

Do you have any left-over holiday ham in the freezer?  I hope you didn't throw away the bone.  Next week I'll share some recipe ideas to use up every last bit of your holiday ham - including my Caramelized Onion, Spinach and Ham Breakfast Strata.  If your ham is all gone, then hang on to these recipes for the next time you have ham left-overs or if you happened to buy an extra one for the freezer when they were on sale - get ready for some hamsational meals!

Tuesday, April 5, 2011

My Favorite Pancakes


Sorry it has been awhile since I have posted anything.  Life got a bit hectic so I took a break from couponing and blogging.  Last week I visited a friend who gave me a huge pile of coupons to go through and after clipping coupons yesterday I am excited to get back into my old routine - which includes blogging.  And since today is my birthday I'm going to share my favorite pancake (and breakfast) recipe.

The original recipe came from Whole Foods online recipe finder.  I was looking for breakfast ideas with protein sources other than meat or eggs.  And that is when I came across this "Fluffy Cottage Cheese Pancake" recipe.  I was very hesitant to make them as I was not a cottage cheese fan and had tried a recipe for "Orange Cloud Pancakes" from the King Arthur Whole Grain cookbook, which contained cottage cheese and I did not enjoy them at all!  After the recipe sat on my recipe stand for awhile I decided to finally give it a try as the comments on the website were all very positive.  The whole family gobbled these down so quickly that they soon became a family favorite and I've been working on making them a bit healthier with whole grains and less cholesterol than the original recipe.  Before we discovered this recipe our favorite pancakes were homemade buttermilk pancakes, but to make the breakfast substantial we always made sausage, eggs, or bacon to go along with it.  Now I make a double batch of these and freeze them for easy midweek breakfasts.


Ingredients:
1/2 cup all-purpose flour
1/2 cup white wheat flour*
1 Tbslp ground flax seed (optional)
1/2 tsp baking soda
1/4 tsp salt
1 Tblsp sucanat (or sugar)
4 eggs
1 cup cottage cheese
1/2 cup milk
2 Tbslp canola oil (or other lightly flavored oil)
Canola oil cooking spray

Preparation:
In a large bowl combine dry ingredients (flour through sugar).  In a separate bowl whisk together wet ingredients (eggs through canola oil).  Combine wet and dry ingredients and whisk until completely blended.

Spray large skillet or griddle with cooking spray then heat over medium heat.  Pour 1/4 cup of batter on to skillet for each pancake.  Cook pancakes for two and a half minutes per side, until they are golden brown and cooked through.  Transfer to plates and serve.  Makes 12 pancakes, serves 4.

Side Notes:  I have tried King Arthur's white wheat flour in this recipe with not a lot of luck.  Lately I have been really enjoying Eagle Mills White Wheat - I can substitute nearly all white flour for this wonderful white wheat in most recipes.  

The picture at the top has the cottage cheese pancakes served with homemade blueberry maple syrup (left-over from some Blueberry Stuffed French Toast).

Recently I tried making my own granola bars and we loved them!  I've been experimenting with the recipe, trying to find things that you may already have in your house, but once I get the best result I will share the recipe with you - it's really not that hard to make your own.  Also look for my favorite salad recipes and the first recipe that I devoted to memory, actually I don't think I ever had a written recipe for it and still don't!

Monday, March 7, 2011

What's in your skillet?


One last "sweets" recipe for Fat Tuesday, then no more til May.

Ryan loves chocolate chip cookies, actually maybe the dough more than the cookies themselves, and he also loves those giant cookies with all the frosting on them from those places at the mall.  Around Valentine's Day (also his birthday) I came across a few recipes calling for making a larger cookie in either a pie plate or a skillet, so I thought I would try my hand at it since he was going to be out of town for his birthday and this would be something he could actually take a piece with him.  All we could say was, MMMM!  I did, however, try making it again for MOPS, but realized after I had already started that I didn't have all of the same ingredients (mainly I didn't have enough oat flour and I tried sucanat with molasses instead of the turbinado with molasses) - so it wasn't anywhere near mmm that time.

So I am a huge fan of America's Test Kitchen and Cook's Illustrated, not at all healthy recipes, but incredibly delicious.  If you aren't familiar with their publications, they test recipes over and over to find the best result.  They also test kitchen equipment as well as products.  In December we came across a test that they had done on chocolate and had already tried their number one - Scharfenberger, but it is extremely pricey and I can only find it in large thick bars.  The number two on the list was Callebaut and was much more reasonably priced.  I don't remember what came in third place, but it was something more familiar to me.  I searched online looking for somewhere that I could get ahold of this Callebaut baking chocolate, but could only find options for ordering huge quantities of it in chip and or bar form.  After giving up on the search for Callebaut and starting my couponing adventures I came across a Toll House coupon and deal, so I picked up a bag.  But we had been buying our chocolate chips in bulk from our local co-op and were really enjoying them, so the Toll House chocolate chips went into the cupboard for later.  The next time I was at the co-op buying bulk items I happened to look more closely at the label for the chocolate chips and found out that I had already discovered Callebaut chocolate and it was sitting in my kitchen!  They also had larger chunks of Callebaut chocolate, that wasn't even labeled as such in their baking aisle.  These chocolate chips are infinitely superior to Toll House and I considered donating the bag I had bought to a food pantry, until my stash of good chocolate chips was low and I needed to bake several items that called for chocolate chips.

For some reason when I make dessert I feel less guilty if I can make it with something that is of some nutritional value.  Of course when I am out and eat dessert that doesn't usually pertain.  I've been working on my chocolate chip cookie recipe over the years to get a chewy, moist, yet full (not flat) cookie.  I've found a few tricks to this and have had good results even with adding some whole grain flours.

Skillet Cookie
Ingredients:
1 1/2 cup oat flour
3/4 cup white wheat flour*
1/4 cup all-purpose flour*
1/2 tsp salt
1 tsp baking soda
1/2 cup softened butter (1 stick)
1/2 cup all vegetable shortening or coconut oil*
1 1/4 cup brown sugar*
1 tsp vanilla
1 egg + 1 yolk
1 - 1 1/2 cups chocolate chips
1/2 cup (or more) pecans or walnuts

Directions:
Preheat oven to 350 degrees.  In a small bowl combine dry ingredients and set aside for later.  Combine butter, shortening, brown sugar and vanilla; beat until creamy.  Beat in the egg and egg yolk.  Gradually add dry ingredients and mix well.  Stir in chocolate chips and nuts (by hand or mixer - whatever you prefer).  Grease a 10 or 11 inch cast iron skillet or 9.5 inch pie plate with butter or oil.  Press the cookie dough
into the skillet or pie plate and bake for 30 - 45 minutes, be sure to check after 30 minutes, especially if you like gooey cookies.  Restrain yourself and allow the cookie to cool before cutting into it.

Side notes: You may want to use a little less flour, depending on your altitude.  I think the 2 1/2 cups is what I figured out when we lived in Boulder, CO.  I'd start with 2 1/4 cups and see if the consistency seems typical or not.  Awhile back I picked up some organic all vegetable shortening made from palm oil, which said it was lower in cholesterol and such, some out there say it isn't good for you while others do.  An alternative would be coconut oil which is extremely healthful, but also some out there will say that it is not.  The other option would be to use another stick of butter.  If you make your brown sugar out of turbinado sugar, I recommend letting the dough sit in the fridge overnight and then let it sit on the counter while you preheat the oven to make it easier to put into the skillet.  This will help the dough to be less granular in texture.  This is also the recipe that I use for chocolate chip cookies, but I increase the oven temp to 375 and bake for 8-10 minutes rotating the cookie sheets top to bottom and front to back halfway through baking.

I forgot to mention that you might want to save some of the dough in balls and freeze them for the occasional sweet craving - to eat raw or to bake, that is the question?  Of course if you decide to give up sweets for Lent this would only be allowed on celebration Sundays or after Easter Sunday!

Click on the title of the recipe to view a printable format of this recipe without the pictures.

Friday, February 11, 2011

Share the Love


Last year we started a Valentine's Day tradition of making cut-out cookies and taking them to friends and neighbors. The idea started from assembling a Valentine themed care package that we were sending to some friends in North Africa. Although we would have loved to send them some of these pretty little cookies I didn't think they would taste quite as scrumptious after their two week+ journey. And Valentine cookie care packages are a fond memory from my own mother in college and whenever I was away from home. This year we made the cookies a bit early as we were going to be out of town for Valentine's Day. Come to think of it we did it early or late last year as well since we were also out of town. This year the kids and I made the dough the night before and the kids were able to roll out, cut, bake and frost the cookies with their Oma (my mom). Aviella and I put the finishing touches on the cookies and we all took them to share with our neighbors together. The kids had a lot of fun wishing others a Happy Valentine's Day.

Several years ago I picked up the King Arthur Whole Grain Baking Cookbook as I wanted to incorporate more whole grains into our menu. Although I do enjoy many recipes from the book, it isn't exactly what I would be looking for today. The recipes aren't necessarily lowfat and/or healthy, but it is a good start to adding whole grains to your everyday food repretoire as well as trying out new whole grains - such as spelt, barley, whole wheat, etc. I do have a few favorite recipes from the book and this is one of them. The recipe below is adapted from King Arthur Flour Whole Grain Baking: Delicious Recipes Using Nutritious Whole Grains.

Chewy Oatmeal Decorating Cookies

Ingredients
1 cup (2 sticks, 8 ounces) unsalted butter
3/4 cup packed brown sugar (or make your own)*
1 large egg
2 tsps vanilla extract
3/4 tsp sea salt
1/2 tsp baking powder
1 tsp cinnamon
1/2 tsp ginger
1 cup old-fashioned rolled oats
1/2 cup traditional whole wheat flour*
2 cups unbleached all-purpose flour*

Directions
Combine butter and sugar, then add the egg, vanilla, salt, baking powder, cinnamon and ginger, beat until smooth. After scraping the bottom and sides of the bowl beat in the oats and flours. The mixture may look dry, but it will work just fine. Divide the dough in half, wrap each piece in plastic wrap, and refrigerate for about 30 minutes. If you are using your own brown sugar made with turbinado sugar I recommend letting the dough sit overnight or for about 6-8 hours for the sugar to "meld" with the other ingredients otherwise it may be a bit granular. If you choose to refrigerate the dough longer or overnight you will need to allow the dough to warm up a bit before rolling out - it can get quite hard.

Preheat the oven to 350 degrees. Line two baking sheets with parchment paper (or a silpat - gotta love these things) or lightly grease two baking sheets.

Take one piece of dough at a time and roll out to about 1/4 thick. Use your
favorite cookie cutters to cut out desired shapes, you can re-roll and cut the scraps. Place the cookies on the baking sheets; as they don't spread you can place them close together. If you have extra cookie sheets you can start the next batch right away otherwise I would recommend waiting until the first cookie sheets cool down.

Bake the cookies, rotating the pans halfway through cooking (moving top to bottom and bottom to top - and I like to turn them 180 degrees as well), 12 to 15 minutes - depending on desired crispness. Remove cookies from the oven and allow to cool on cooling rack. You can top these cookies with a simple cinnamon and sugar mixture right after they come out of the oven or as I prefer a simple powdered sugar icing.

My notes: You could likely reduce the brown sugar to 1/2 cup and still have enough sweetness - I think I will try this next time. Also, you could use sucanat in place of the brown sugar and add a bit of molasses. My most recent batch of these cookies I used 1/2 cup oat flour, 1 cup white wheat flour and 1 cup all-purpose flour and they tasted great! Don't be afraid to experiment with the flour options - but I typically start with about half the amount of all-purpose flour and adapting the other half to a mixture of flours or white wheat. If it works well and you want to try with more whole grain flour - make your changes in small amounts (1/4 cup) at a time as it can change the dynamics of a recipe drastically.


Icing
Powdered Sugar
Milk
Almond Extract (or vanilla)
Food coloring (preferably all natural)

Sorry, no exact measurements here. I typically pour some powdered sugar into a bowl, add a tiny bit of almond extract (a drop or so), a small splash of milk and a drop or two of food coloring and stir. You will want it fairly thick (add more powdered sugar to achieve desired thickness). It should be spreadable, but not too runny. I like to have it a bit less thick so that I can "drizzle" it on cookies and/or make designs. But if it is too thin it is hard to make designs that actually look like something. With my kids being so young it is also hard for them to spread the frosting, so drizzling can be easier for them. If you want some to look nice, set a few aside to do yourself and let the kids help with as many as they enjoy helping with. And of course let them enjoy their work too:).

Wednesday, February 9, 2011

Red Velvet Surprise Cupcakes


So, are you curious as to what the surprise is in these tremendous cupcakes? Or do you already know since I actually made them back in September for my daughter's third birthday?

I desperately wanted to make a red velvet cake without using food coloring (due to it being not healthy for you and two full bottles in a cupcake recipe sounds terrible to me) and since beets had been used during World War II due to food rationing I began my search for a chocolate beet cake aka Red Velvet. Oh and I happen to love sweet beets - they are almost like candy when cooked right with a bit of butter and salt. Yum, my mouth is starting to water. Anyway...during the process I found out that you did not have to use beets to get a reddish color, but rather a lighter unprocessed cocoa along with an acidic agent such as vinegar, lemon juice and/or buttermilk. The first recipe that I experimented with yielded a beautiful reddish purple batter, but alas the cake was totally brown after baking. The third batch yielded a truly red cupcake without food coloring, but the texture was a bit too mushy and not very chocolaty. So, I created my own recipe combining one that had great texture and taste with the one that resulted the best color. And here it is for you my friends to try. Beets are a cold weather vegetable so you shouldn't have a problem finding them in your local store, but since they are a root vegetable I try to find organic. Before you dismiss the beets entirely, just think of pumpkin bread/cake, carrot cake, banana bread/cake or zucchini bread - it is not uncommon to have fruits and vegetables in sweets.

Red Velvet Surprise Cupcakes

Ingredients:
3/4 cup flour*
1/4 cup unprocessed (non-dutch) cocoa*
3/4 cup sugar (sucanat or turbinado can be used)
1 tsp baking powder
1/4 tsp sea salt
3/4 cup beet puree
1/4 cup canola oil
2 Tblsp lemon juice
1/4 cup buttermilk*
2 eggs, room temperature
1 tsp vanilla
12 frozen raspberries (optional)**

Directions:
Steam beets until a knife or fork pierces flesh easily (slides in without hesitation). Carefully peel beets, you can use gloves if you prefer. I like to make to slits on either side of the beet (after cutting off top and bottom) and gently rub the skin off. Puree beets in food processor and set aside (this step can be done in advance). Preheat oven to 350 degrees. Grease or line 12 wells in a cupcake pan. Combine first five ingredients and stir; set aside. Mix together beet puree, oil, lemon juice buttermilk, eggs and vanilla in a large bowl. Slowly add the dry ingredients to the wet ingredients and mix thoroughly. Fill the cupcake wells 2/3 full. Bake for 15 minutes or until a toothpick comes out clean. Cool on a wire rack before icing.

*My notes: When I made these cupcakes I combined whole wheat pastry flour with "power flour." Power flour is a mixture of various whole grain flours - such as oat, spelt, barley, brown rice, sorghum, white wheat, etc. I make it with whatever I have on hand or whatever suits my fancy from the bulk section at the co-op. Typically I use equal parts of each type of flour that I am using, but sometimes I have just a little bit more of one so I add it all. The nice thing about mixing all of these whole grain flours together is that you don't notice any particular taste/quality of the individual whole grain. If I were making this cupcake today I would likely use 1/4 cup all-purpose, 1/4 cup white wheat and 1/4 cup power flour, but do whatever you want, just mix up the whole grains if you decide to use them. So the key to getting red cupcakes is the type of cocoa you use. If the label says Dutch-processed - do not use this! The acidity has been lowered using an alkalizing agent and will not net the red result you desire. The lighter the cocoa, the better the result. And although I am a huge dark chocolate fan, don't use it for this recipe. You shouldn't have a problem finding non-Dutch processed cocoa in your local grocery store, but be sure to read the label. There are some cocoas out there labeled cocoa rouge or raw/natural cocoa. Also, make sure it is unsweetened. And although for most recipes you can substitute a cup of milk with 1 Tblsp vinegar or lemon juice added to make your own "buttermilk" I would use the real thing for this recipe due to the existence of lemon juice in the recipe already. And I would prefer the real thing over powdered buttermilk as well. But, you could try and see what happens or since it is not much try plain yogurt instead.

**A unique addition you might like to try is freezing 12 raspberries and placing one at the bottom of each cupcake before pouring the batter in. Works best with cupcake liners. Which, you can actually make your own if you have parchment paper - just cut them into squares and fit into your cupcake tins. Oh and I like to spray my liners with a bit of oil so that they are easier to detach from the liner - not too much though or they will fall off immediately.

Now for the icing - there is much debate over this when looking for recipes. Some say it must be cream cheese frosting while others insist it should be boiled frosting. I went with a cream cheese frosting as I love cream cheese frosting, but I'm not sure that I was entirely happy with the result. So, I will give you two other icing recipes and you can decide which one to use. Now I did not try the boiled frosting because it sounded odd to me, but I've been told that it is wonderful! So, you decide.

Cream Cheese Frosting
8 oz neufchatel (or full fat if you prefer)
3 Tblsp butter, softened (optional)
maple syrup to taste or about 1 cup powdered sugar

If you are using full fat cream cheese then you will need to let it soften. If you are using neufchatel then you shouldn't need to. Using an electric mixer beat neufchatel and butter until smooth. Slowly add maple syrup or powdered sugar to desired sweetness and consistency. If you are really ambitious and don't mind what color your frosting is or if you plan to add some color to it anyway (I recommend natural food colorings) then try making your own unprocessed powdered sugar from sucanat.

The boiled frosting recipe below comes from my mother-in-law and may be more than you need for 12 cupcakes, so I would recommend cutting it in half. If you read up on the history of Red Velvet Cake you will probably find a story about the Waldorf Astoria Hotel. Hence the name below.

Red Velvet (Waldorf) Frosting aka Boiled Frosting
3T flour
1 C. milk (use organic whole milk)

Whisk the flour and milk in a small saucepan. Cook over medium. Heat stirring constantly until it thickens. Set aside and cool. (It is very important to cool or it will melt the butter and ruin the frosting.)

Cream together:
1 t. vanilla
1 C. room temperature butter
1 C. sugar

Once it is light and fluffy then add the cooked milk mixture. Mix on high speed until it has the consistency of whipped cream.

Another unique option is to add an egg to the cream cheese frosting and place a dollop of the "frosting" in the cupcake batter and bake it in. I actually did try this, using up the strange concoction of cream cheese frosting I used for my daughter's cupcakes and wow were these ever yummy. So my concoction also involved whipped cream and almond flavoring. Sorry I don't have exact measurements, but it was probably about a cup of whipped cream and a tsp of almond extract. I think I also added chocolate chips to the batter when I made this. The cupcakes weren't red - I used dark chocolate cocoa, but they certainly were tasty!

Thursday, February 3, 2011

Variety is the Spice of Life


I know many of you might be turning up your nose to tofu, but then again many of you may have tried it and liked it or not entirely enjoyed it or you could be one of the few that actually eats it quite regularly. We kind of go in spurts in our household as there are a handful of recipes that I have found that we enjoy. My son actually loves it (he is only 21 months)! I was trying to incorporate it into our meal plan on a weekly or bi-weekly basis, but lately it has been much less. Partly because my freezer is well stocked with venison and that has now become a meal priority! We do, however, have at least one meat-free meal each week.

There are many benefits to tofu - it is usually cheap, stores for quite a while and is extremely versatile (in addition to all the other things you've probably heard/read about soy). Recently, however, I have discovered that there are some issues with unfermented soy products as well as Genetically Modified soy (or anything GM for that matter). I guess my motto is - Variety is the Spice of Life! So now we have it about once a month and I try to combine fermented soy with unfermented soy (much of the tofu we find in stores). Okay, now that I've totally scared you, if you don't want to try the tofu in this recipe, it can be replaced with just about any other meat product - chicken, shrimp, beef or pork would be great substitutes. Just don't marinade them as long as I do the tofu!

Some people avoid tofu because of the texture. That is what I love about this recipe, the wheat berries in here add that chewiness that we (omnivores) typically enjoy when eating meat. Some avoid it because of the lack of flavor - which is unfortunate because it can have so much flavor, if prepared well. So, what the hey, give it a try and see what you think! Be sure to look for a non-GM tofu option. Oh and give yourself some time for this one - it takes a bit of advanced prep, you need to start the night before you plan on making this. But in my opinion it is worth it.

The idea for this recipe came from Tosca Reno's book "The Eat-Clean Diet for Family & Kids." After reading her tofu and wheat berry salad recipe I thought hmm, that looks and sounds similar to fried rice - why not add a few more things and make it a meal instead of a salad. So that is what I did and now it has become a family favorite.

Tofu Fried Rice

Marinade:
6 Tbsp light soy sauce or low-sodium tamari
2 tsp fresh ginger root , peeled and minced*
3 cloves garlic, pressed
2 Tbsp oil*
Pinch red pepper flakes
1 tsp agave nectar*
1/4 tsp toasted sesame oil

Other Ingredients:
1 - 12-16 oz pkg firm (or extra firm) tofu
3-4 cups water or low-sodium stock/broth
1/2 cup brown rice (or rice mix/blend)*
1/2 cup wheat berries*
1/4 cup thinly sliced scallions/chives (optional)
1 medium onion, peeled and chopped
1 medium carrot, peeled and chopped
1 medium zucchini, chopped
1/2 cup frozen peas, thawed
2 eggs (or half cup egg whites/egg substitute)
Sea salt and fresh ground black pepper
Sesame seeds (optional)

Preparation:
Place wheat berries in a glass bowl. Cover with about 4 cups water. Put a plate over the bowl and let stand overnight (on counter). Remove tofu from package and drain water. Place on plate lined with several layers of paper towel (or use a skoy cloth or similar absorptive re-usable cloth). Cover tofu with more paper towels or another absorptive re-usable cloth. Top with a plate and heavy items to weight down (and drain) tofu overnight in refrigerator.

In the morning, make marinade by mixing ingredients above. Cut tofu in half so that you have two large thin slabs and place (or other meat) in flat glass dish. Cover with marinade and flip slabs half-way through the day - keep refrigerated. If you plan to use meat, only marinade for about an hour and reserve some of the marinade (about 2 Tblsp) for later use.

Prepare rice and wheat berries. The recipe calls for doing these separately and in the oven, but I do them on the stove and I believe the last time I did them together. If you have a rice cooker you could also use that. The wheat berries will need to be drained before cooking. If you have package directions for your rice - follow that, otherwise I typically double the amount of water/stock per rice (so for here it would be half cup rice to one cup water/stock). For the wheat berries use about 1 1/2 cups water/stock to the 1/2 cup wheat berries. Or if you combine them, use 2 1/2 cups water/stock for both. This will likely take about 45 minutes for the rice and wheat berries to become tender.

Meanwhile, remove tofu from marinade and cut into small bite-sized cubes, reserve marinade (do not do this if using meat/seafood). Sauté onion in a touch of oil in a large non-stick pan over medium heat. Add tofu and cook until starting to brown. Add carrots, zucchini and peas. When carrots are
starting to soften make a "hole" in the center of the pan by pushing the tofu and veggies to the sides. Place your eggs or egg whites or egg substitute in the center of the pan and fry/scramble. When eggs are cooked add rice and wheat berries. Season with salt and pepper and 2 Tbsp of reserved marinade. Plate fried rice and sprinkle with sliced chives/scallions and sesame seeds if you desire.

*My notes: For mincing the ginger, I like to use a microplane grater that I hold over the bowl or measuring cup that I want the ginger in. I rarely measure the ginger (I guesstimate), but if you want to, then I suggest doing it over a separate bowl before adding it to the marinade. The recipe calls for olive oil, but since it is eventually going to be cooked I prefer to use a different oil. I've been trying out new oils - recently sunflower and safflower have been in my cupboards. I suggest you find a "cooking" oil that you like. Why don't I use olive oil for cooking? It's kind of a waste - all the benefits of olive oil are completely lost when you heat it up. What is agave nectar? It is a sugar alternative that is fairly new to the market and of course not without it's own controversies. In essence - sugar is sugar, no matter what form it comes in and sugar is not good for you - period! However, most people want to enjoy life, so we eat a bit (or a lot) of sugar. You could try honey or maple syrup in it's place if you do not want to try agave nectar or don't have it on hand. Agave nectar is more concentrated than these other sweeteners, so you may want to double it, but that is not necessary - I don't even remember using it, but I probably did. Not sure if you like 
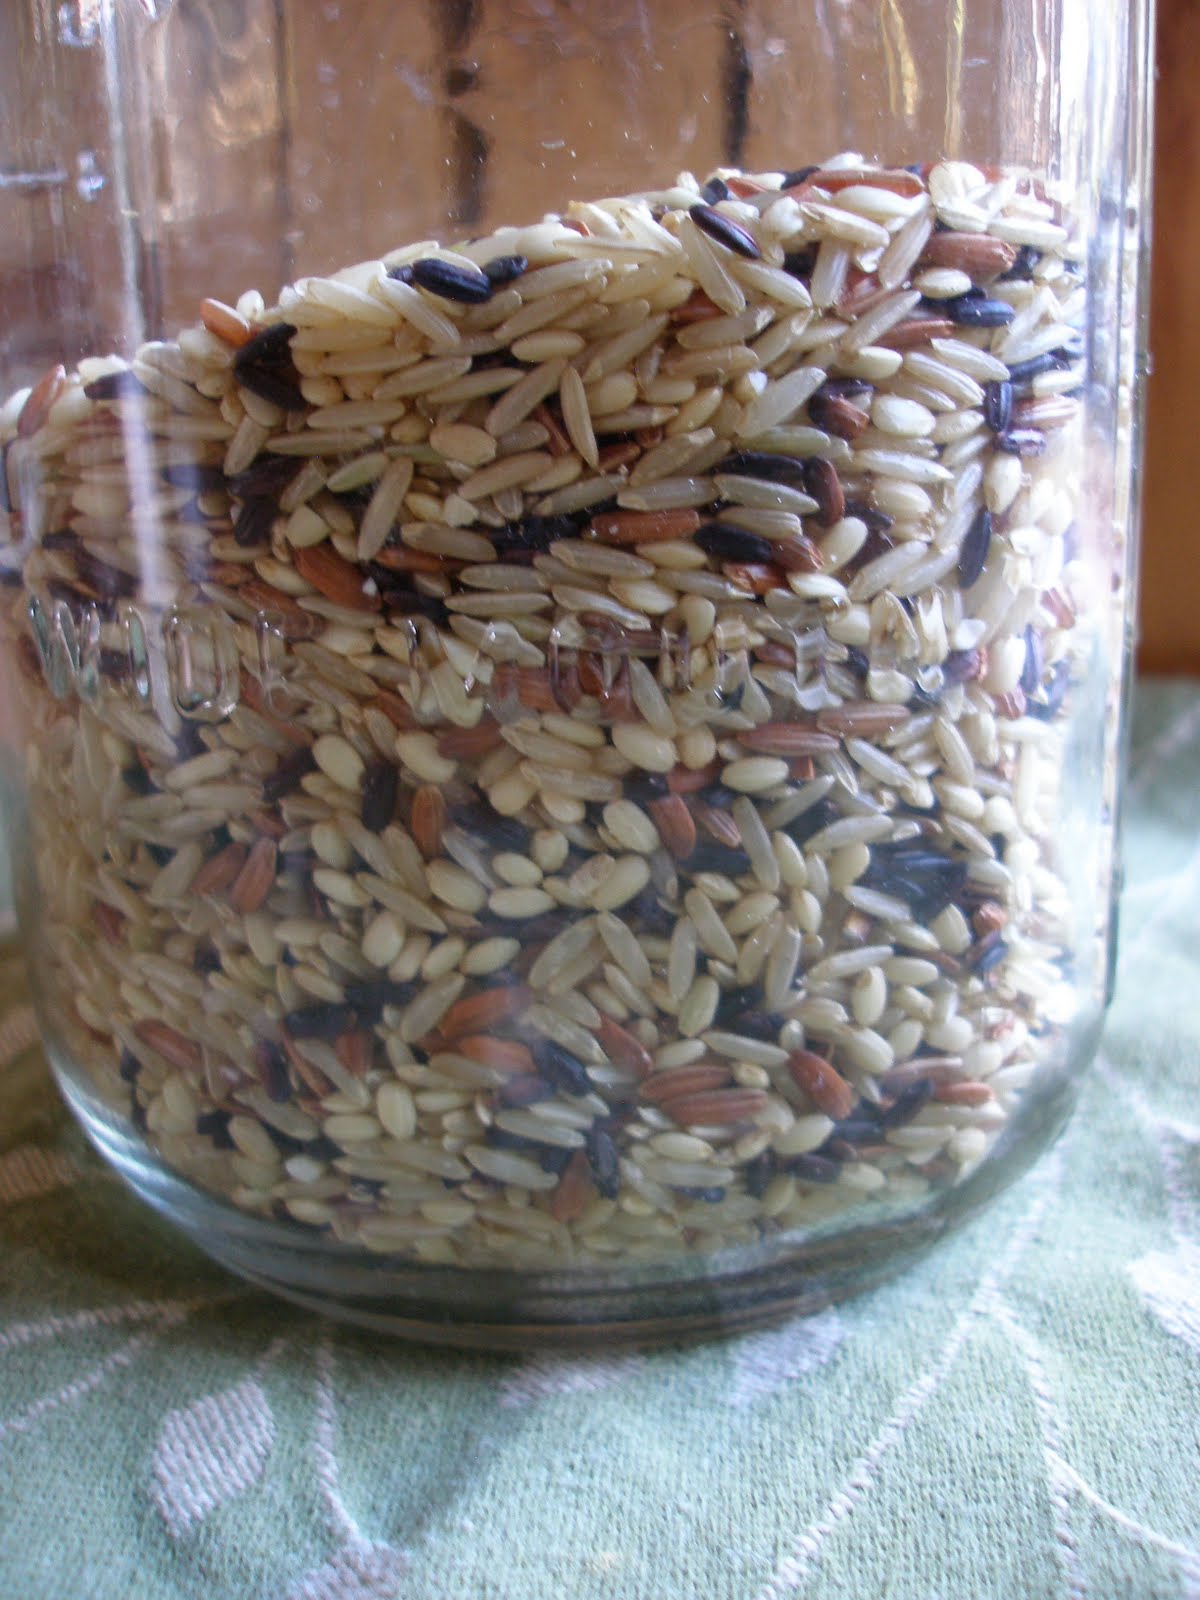
brown rice, we didn't use to. Then I started trying other varieties and mixing them together - then one day it was like, wow this is brown rice? Of course it still doesn't taste like white rice, but it has more flavor than the original stuff that I was getting. So, there are a few options for making brown rice better. What I like to do is go to the co-op and pick from their bulk bins a variety of brown (or colored) rice. My mix usually contains a short sweet brown rice, a longer brown rice, a little bit of wild rice, some red rice and sometimes black japanica rice. You could also add a bit of quinoa, barley, and/or millet. Another option is if you have a Costco membership I hear they have a good mix for a good price. And yet another option is check your local grocery store - they often sell containers of mixed rice. In fact, Mambo Sprouts currently has a coupon for RiceTec, which I've seen at Roundys and Kroger stores. Don't know where to find 
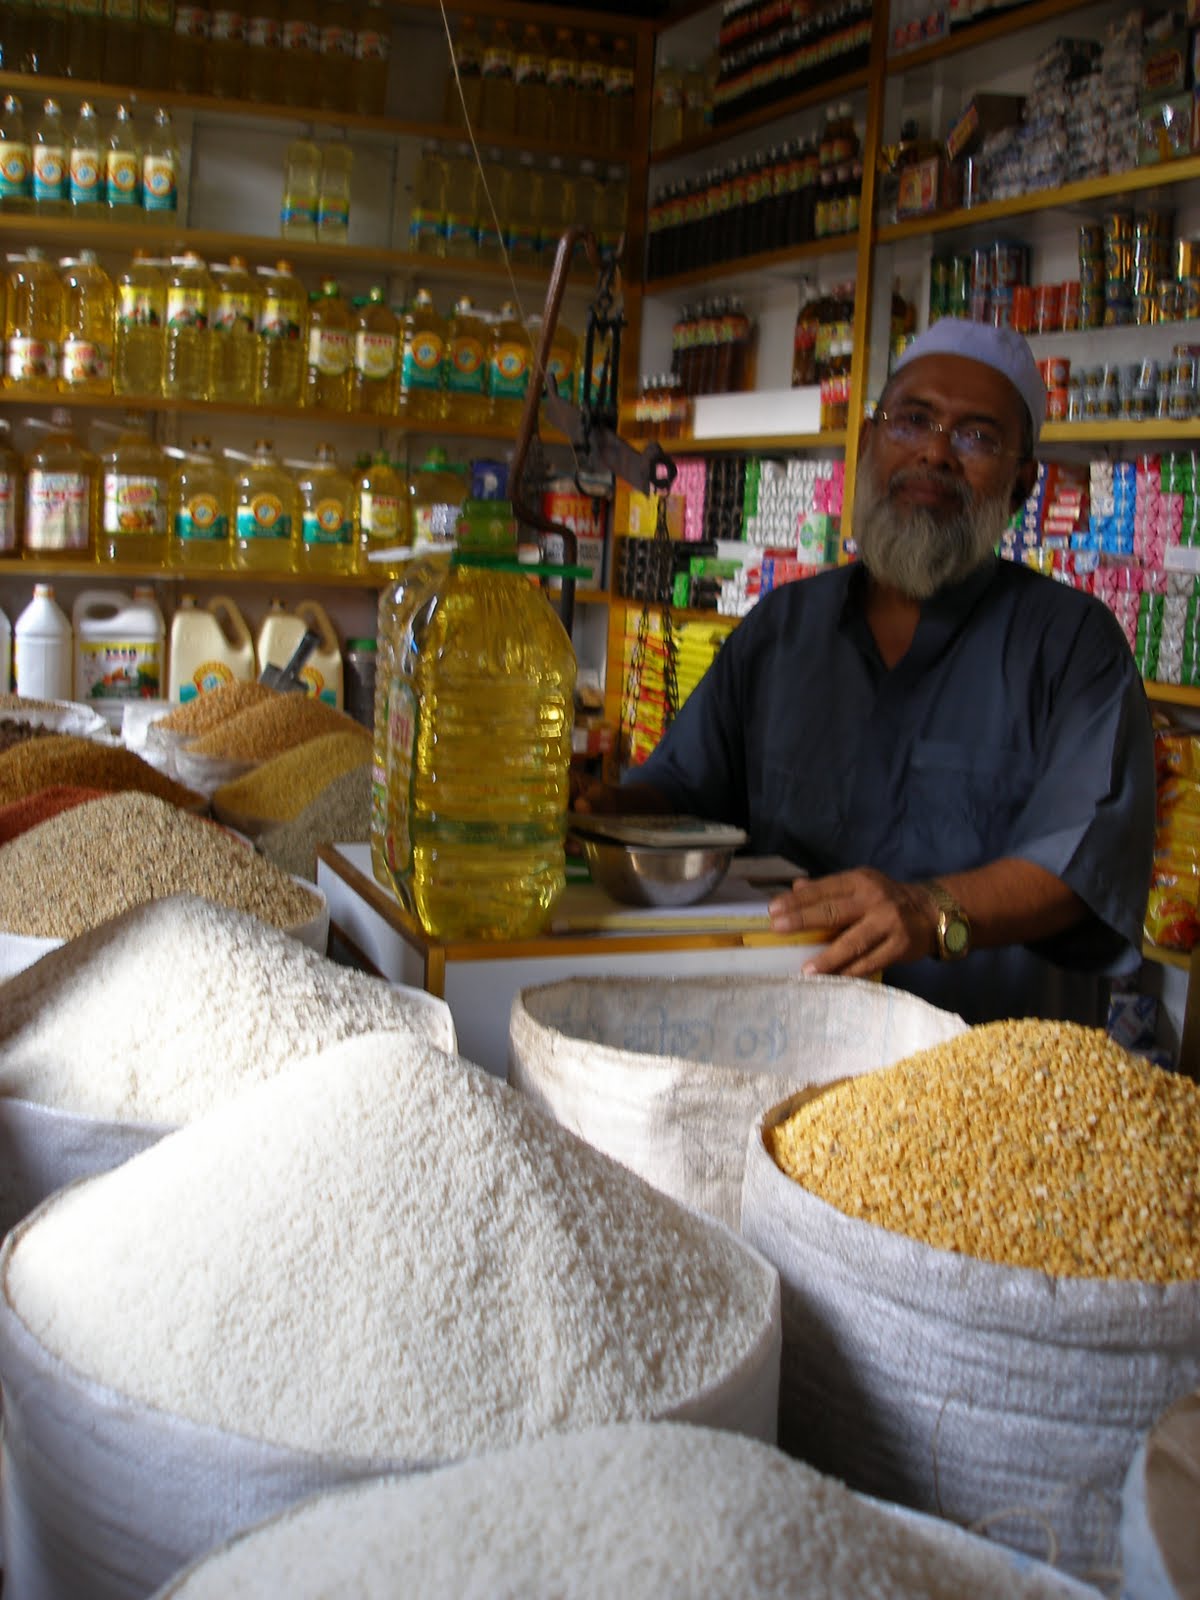
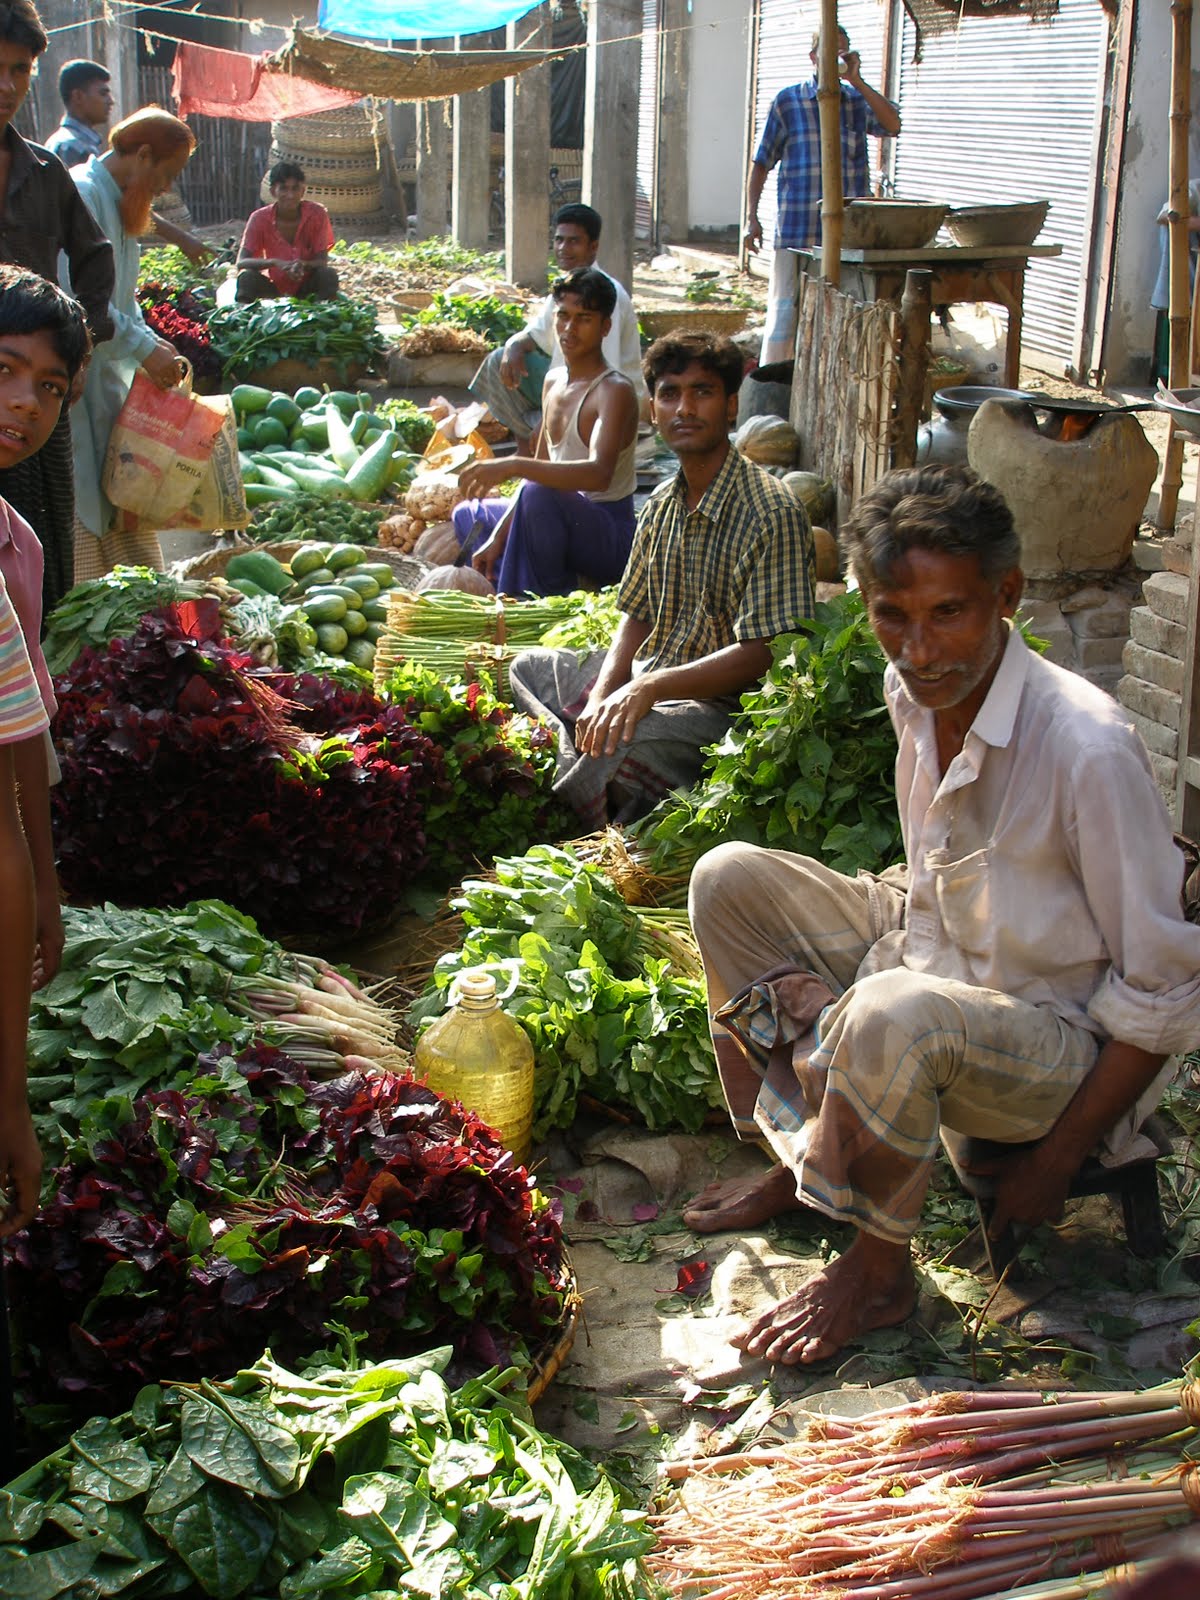
wheat berries? Unfortunately I don't have a ton of ideas for this. I would check any store that has a bulk section. I have found them at my co-op and other health food stores. Or, if you happen to live in Bangladesh - you should be able to find them in your local market quite easily! :) Hope you enjoy these additional pics from Bangladesh markets (a trip we made before kids, although I'd love to travel with them someday).

This is getting posted earlier than I originally anticipated to make room for some Valentine's Day items next week. I'll be sharing my Red Velvet Surprise cupcake recipe as well as my favorite whole grain cut-out cookie recipe.

Wednesday, January 26, 2011

What to do with old bread?


Does anyone else have the problem of too much bread in your freezer? I rarely ever buy bakery bread anymore, but when I did we never seemed to use all of it before it got old or hard. So, I'd throw it in the freezer for some later use. Now I tend to make my own (check out the book Healthy Bread in Five Minutes a Day) or my grandma gives me day old Panera bread from the senior center. The Monday after Christmas she picked up a ton of bread because there weren't many other seniors getting bread that day. She gave me a grocery bag full of bread. Awesome, now what do I do with it? Some of it I shared with other family members and some of it I froze for future use. One loaf was a gigantic whole grain bread that immediately made me think of French Toast. The first batch of French Toast was greatly lacking, so I started looking for more ideas. I had just picked up two pints of blueberries that were on sale so that helped me in my quest for a great recipe! I found a wonderful Overnight Blueberry French Toast recipe on allrecipes.com, but of course it needed some tweaking to make it healthier.

If you don't happen to have a ton of old bread in your freezer, you can usually find day old bread at a reduced rate in most grocery stores or at bakeries if you ask. For this recipe try to find something that has at least a bit of whole grains in it. Wheat, oat, quinoa, etc. The first time I made this it was just for our family, so I cut the recipe in half. It was so incredible that I had to make it for MOPS. But when I made it for MOPS something seemed different. I later realized that when I cut the recipe in half for our family, I did not cut the syrup recipe in half. So it essentially needed more of the blueberry syrup. I'm going to give you the half recipe because the full recipe is more than you would need for a typical family on a weekday. But for special occasions or guests, you may want to double my recipe below. And yes, you can make this in the middle of the week! Do the prep the night before, keep it in the fridge overnight and when you wake up take it out of the fridge to warm up to room temp and then throw it in the oven. My son (21 months) loved this so much he licked his plate clean! (He doesn't know that's bad manners yet.)

Blueberry Stuffed French Toast (1/2 recipe)
6 slices day-old bread (1-inch thick)
1 cup fresh blueberries
3 eggs, beaten
3/4 cup egg whites (about 5 large eggs)
1 cup low fat milk
1 teaspoon vanilla extract
2 Tbsp maple syrup
dash or two of cinnamon

Filling:
4 oz cream cheese (I use lowfat/neufchatel)
1/2 cup cottage cheese (1% or 2%)
1/2 tsp vanilla extract
1-2 tsps maple syrup

Syrup:
2 Tbsp water
1 pint fresh blueberries
1/2 cup maple syrup

Lightly grease a 9x9 inch baking dish. Combine filling ingredients in a food processor until smooth. Arrange half the bread slices flat on the bottom of the dish, and top with filling. Sprinkle 1 cup blueberries over the cream cheese filling, and cut remaining bread into 1-inch cubes before covering the blueberries.

In a large bowl, mix the eggs, milk, vanilla extract, and syrup. Pour over the bread cubes. Cover with plastic wrap, weight down and refrigerate overnight.

Remove the bread cube mixture from the refrigerator about 30 minutes before baking. Preheat the oven to 350 degrees F (175 degrees C).

Cover with foil, and bake 30 minutes. Uncover, and continue baking 25 to 30 minutes, until center is firm and surface is lightly browned.

In a medium saucepan, mix the water, blueberries and maple syrup. Bring to a simmer over medium-low heat for 5-6 minutes or until blueberries begin to split. Pour over the baked French toast or reserve the syrup on the side to be poured over individual pieces.

Side Notes: I tried both flat slices of bread and cubed bread for the bottom of this dish and I would recommend the flat. When I did the cubed bread I had three different kinds of bread I was using, so I wanted to mix it up, but it was harder to spread the filling over the bread cubes. I did, however, find that the bread cubes made for a nicer presentation on top than the bread slices. I also thought about trying orange zest or lemon zest in the cream cheese filling in place of the vanilla, but haven't done this yet. Let me know if you try it.

You may have noticed that I eliminated all white sugar from this recipe and replaced it with real maple syrup (not corn syrup) - my preference is Grade A dark amber, but whatever you can get a hold of at a good price is best. I have found that Sam's club has the best price per ounce and since we use it often I don't mind having a large bottle around.

I have not tried this with frozen blueberries, but it might work just fine. We have had some amazing sales on blueberries lately - and in the middle of winter I jumped on these even though they were not organic (I try to stick to organic on the dirty dozen). When I don't buy organic I try to soak my fruits and veggies in cold water with a bit of vinegar. And I recently came across a Do-It-Yourself Veggie Wash, but in place of the fresh lemon juice I like to use four drops of lemon essential oil. That way you don't have to keep the spray in the fridge.

And if this is the first recipe of mine that you have checked out, you are probably wondering why the cottage cheese? Well, it's available in low fat and has lots of protein compared to cream cheese, sour cream, or even yogurt. I whip it up in my food processor and use it as a filling, a spread, a dip, or in place of sour cream on tacos. If I want a sweet filling I add maple syrup, if I want to use it as a spread on my bagel I might combine it with some all fruit preserves, as a dip you could add Ranch seasoning or try making your own (less preservatives that way) and for a sour cream replacement add a bit of fresh lemon juice. Today the kids had it as a snack on some graham crackers - YUM!